

Studio setup
Ambient Studio is the web UI for the Ambient engine. You add a video, ask a question, and watch the agent work: its reasoning, its tool calls, and an answer whose timestamps jump the player to the moment they cite.
Studio is a Next.js app that runs as its own service. It needs two things:
- An Ambient engine. Studio talks to the engine’s
/v1API from its server. The engine API key stays on the server and never reaches the browser. - A Postgres database. Studio stores its own chats, messages, and users there. It can be a separate database on the same Postgres server the engine uses. Studio does not need Redis.
Run Studio with Docker
Section titled “Run Studio with Docker”With the installer (recommended)
Section titled “With the installer (recommended)”The Ambient installer runs the engine, Studio, Postgres, and Redis together in Docker. If you followed the Quickstart, Studio is already running.
-
Run the installer.
Terminal curl -fsSL https://ambient-intelligence-hq.github.io/install.sh | bashIt asks for your LLM endpoint, models, and API key, writes
~/.ambient/, pulls the images, starts everything, and opens Studio in your browser when the stack is healthy. -
Find the Studio URL.
Studio listens on port
3000by default. If that port is taken, the installer picks the next free one and prints it at the end. To see it again:Terminal ambientctl statusOutput (excerpt) Studio: http://localhost:3000API: http://localhost:8080 (Anthropic SDK base_url; key: ambientctl config get ENGINE_API_KEY) -
Open it.
Terminal ambientctl open
The installer wires Studio up for you: it creates Studio’s own ambient_studio database on the bundled Postgres, generates AUTH_SECRET and ENGINE_API_KEY, and points Studio at the engine container. You don’t need to set any Studio variables yourself.
Useful commands for the Studio container:
ambientctl logs studio # follow Studio's logsambientctl restart # restart the stackambientctl update # pull newer images and restart (Studio migrates its database on start)On its own, against an existing engine
Section titled “On its own, against an existing engine”The Studio image is published as ghcr.io/ambient-intelligence-hq/ambient-studio. Use it when you already have an engine and a Postgres server running. On start, the container creates its database if it’s missing, applies migrations, and then serves on port 3000.
-
Generate a session secret, and keep it somewhere safe so you can reuse it.
Terminal export AUTH_SECRET="$(openssl rand -base64 32)" -
Start the container. Set the four required variables: the Postgres URL, the secret, the engine URL, and the engine’s API key.
Terminal docker run -d --name ambient-studio -p 3000:3000 \-e POSTGRES_URL=postgresql://ambient:ambient@host.docker.internal:5432/ambient_studio \-e AUTH_SECRET \-e ENGINE_URL=http://host.docker.internal:8080 \-e ENGINE_API_KEY=dev-token \ghcr.io/ambient-intelligence-hq/ambient-studio:latestENGINE_URLandPOSTGRES_URLare resolved from inside the container, so127.0.0.1would point at the container itself.host.docker.internalreaches your machine on Docker Desktop. On Linux, add--add-host=host.docker.internal:host-gateway. -
Check that it’s up.
Terminal curl http://localhost:3000/pingOutput pong
Run Studio from source
Section titled “Run Studio from source”Use this path when you’re working on Studio itself. Studio lives in ambient/studio/console in the Ambient repository.
You need: Node.js (the Studio image uses Node 24), pnpm 10, a Postgres server, and a running engine. To run the engine from source, see the Development section of the repository README.
-
Start Postgres. From the repository root, the dev compose file starts Postgres (user and password
ambient) and Redis for the engine:Terminal docker compose up -d postgres redis -
Install Studio’s dependencies.
Terminal cd ambient/studio/consolepnpm install -
Create
.env.localfrom the example and fill it in. See Configure Studio for what each variable does.Terminal cp .env.example .env.local.env.local AUTH_SECRET=<output of: openssl rand -base64 32>POSTGRES_URL=postgresql://ambient:ambient@127.0.0.1:5432/ambient_studioENGINE_URL=http://127.0.0.1:8080ENGINE_API_KEY=dev-tokenENGINE_API_KEYmust match the engine’sAPI_KEY.dev-tokenis the value the README uses for a local engine. -
Create the database schema. This creates the
ambient_studiodatabase if it doesn’t exist, then applies migrations.Terminal pnpm db:migrate -
Start the dev server.
Terminal pnpm devStudio is now at http://localhost:3000.
Configure Studio
Section titled “Configure Studio”Studio reads its settings from environment variables: .env.local when you run from source, or the container environment with Docker.
Required
Section titled “Required”| Variable | What it does |
|---|---|
ENGINE_URL | Base URL of the Ambient engine, for example http://127.0.0.1:8080. Studio calls ${ENGINE_URL}/v1/... from its server. |
ENGINE_API_KEY | The engine’s API key, sent as the x-api-key header. Must match the engine’s API_KEY. It is never sent to the browser. |
POSTGRES_URL | Studio’s own database for chats, messages, and users, for example postgresql://ambient:ambient@127.0.0.1:5432/ambient_studio. A separate database on the engine’s Postgres server is fine. |
AUTH_SECRET | Encrypts the sign-in session cookie. Generate it with openssl rand -base64 32. |
Optional
Section titled “Optional”| Variable | What it does |
|---|---|
STUDIO_MAX_MESSAGES_PER_HOUR | Per-user message quota. Unset or 0 means unlimited, which suits a self-hosted install with your own key. Set it for a public demo. |
AI_GATEWAY_API_KEY | A Vercel AI Gateway key, used only to write chat titles with an LLM. Without it, a chat’s title is taken from its first message. |
The model, LLM endpoint, and video settings belong to the engine, not Studio. See the configuration reference. You can also override the model, endpoint, and system prompt per agent from Studio’s Settings page. The walkthrough shows how.
Point Studio at a different engine
Section titled “Point Studio at a different engine”Set ENGINE_URL and ENGINE_API_KEY to the engine you want, then restart Studio. Before you do, check that the engine is reachable from where Studio runs:
curl http://127.0.0.1:8080/v1/healthz{"status":"ok"}Open Studio
Section titled “Open Studio”Open the Studio URL in your browser. There’s no sign-in screen: on your first visit, Studio creates a guest user for your browser and signs you in automatically. Your chats belong to that guest, so they show up in the sidebar on later visits from the same browser.
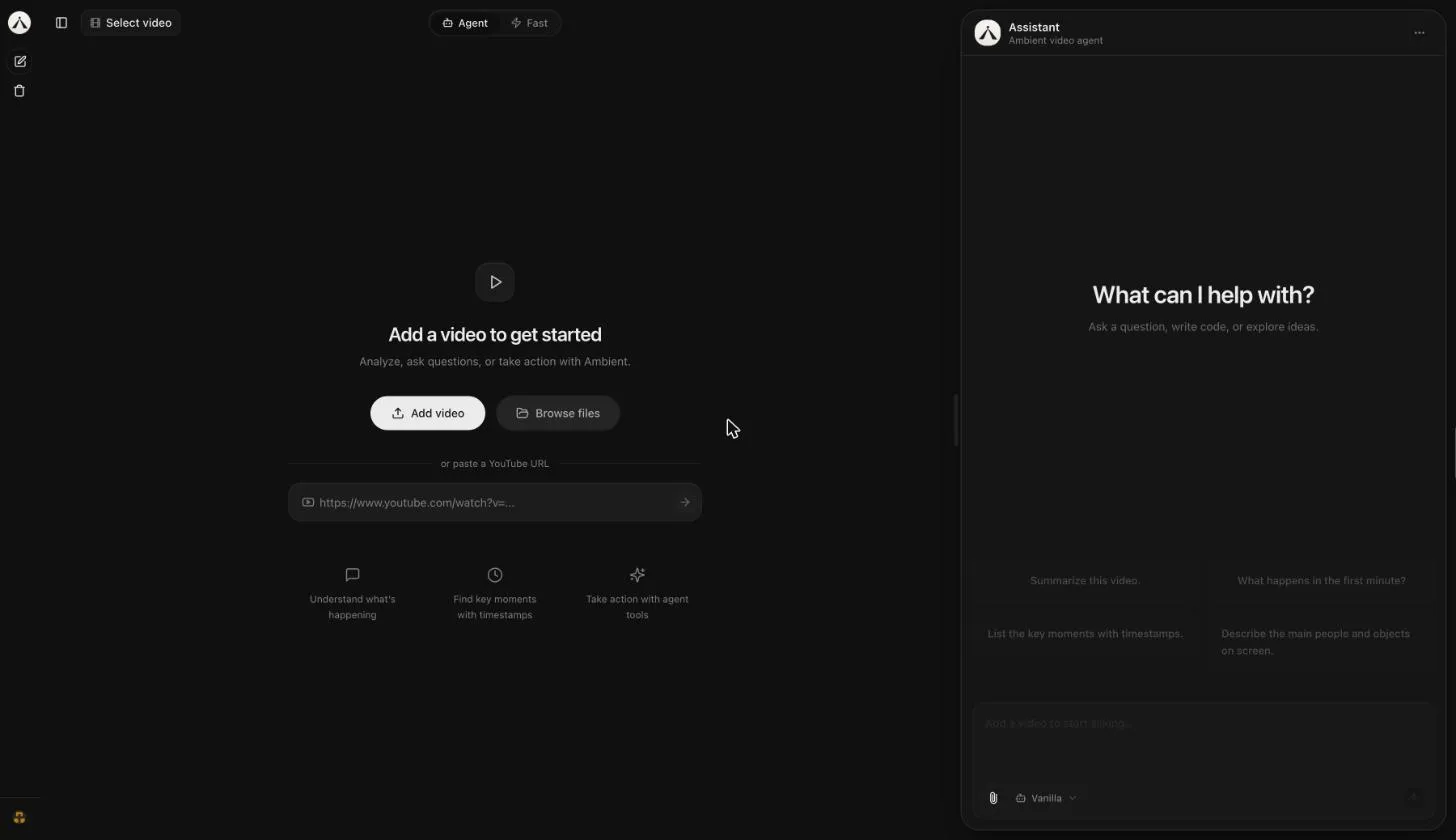
Every new chat starts on the Add a video to get started stage. You can:
- click Add video to upload a file from your computer, or drop a video file anywhere on the stage;
- click Browse files to reuse a video already in the engine;
- paste a YouTube URL into the field under or paste a YouTube URL.
The question box on the right stays disabled, with the hint Add a video to start asking…, until a video is picked.
Troubleshooting
Section titled “Troubleshooting”- The video list is empty or videos fail to load. Studio can’t reach the engine. Check that
ENGINE_URLis reachable from where Studio runs (from inside the container, with Docker) and thatENGINE_API_KEYmatches the engine’s key.ambientctl logs studioor the dev server output shows the engine’s error. - The container exits on start. It runs migrations first. Check that
POSTGRES_URLis correct and the database server is reachable. If the user can’t create databases, createambient_studioyourself. - You lost your chats. Chats belong to the guest user tied to your browser’s session cookie. Clearing cookies, switching browsers, or changing
AUTH_SECRETstarts a new guest. Your videos are kept, because they’re stored in the engine.